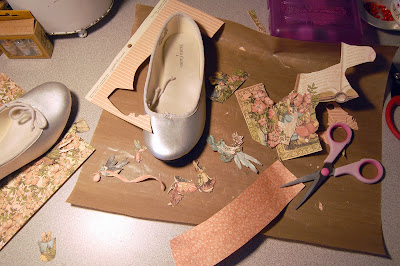
Last weekend I decided to make a pair of "Altered Art Shoes," and since I was making them for my granddaughter, I choose to use Graphic 45 Papers' new 'Once Upon A Springtime' 8" x 8" Paper Pad. Presley, my granddaughter, loves pink, so I concentrated on selecting pink prints for the background paper for the shoe's base. (I bought the shoes on clearance at Wal-Mart for only $3.)
I had to find small images for the main embellishment since the shoes were so tiny! The 8" x 8" pads have smaller images than the regular 12" x 12" papers. I cut out all of the fairy, frog, bunny, and flower images first and planned where they would fit and then how to make them 'interact" with each other.

When the time came to begin gluing the paper to the shoes, I choose to tear the background (base) papers into small pieces and soften them so they would be able to "move" with the shoe when it bent when Presley walked. By "soften" I mean I broke down the stiff paper fibers by rubbing it against the edge of my desk, wrinkling it a bit and then almost "molding" it with my fingers. The end result when you soften the paper is it almost feels like fabric. I then started gluing it down using Glossy Accents (you may use Crystal Laquer or any "decoupage" type adhesive.) I then created the "collage" that became her "Fairy Shoes." As I worked around the shoe, I continued to bend it so I could make sure the glue was sticking and would not pop off when she walked in them.

When the time came to begin gluing the paper to the shoes, I choose to tear the background (base) papers into small pieces and soften them so they would be able to "move" with the shoe when it bent when Presley walked. By "soften" I mean I broke down the stiff paper fibers by rubbing it against the edge of my desk, wrinkling it a bit and then almost "molding" it with my fingers. The end result when you soften the paper is it almost feels like fabric. I then started gluing it down using Glossy Accents (you may use Crystal Laquer or any "decoupage" type adhesive.) I then created the "collage" that became her "Fairy Shoes." As I worked around the shoe, I continued to bend it so I could make sure the glue was sticking and would not pop off when she walked in them.
Once the papers were all in place I went back over the shoes with more Glossy Accents to give the shoes more shine. (I bent them again and glued down any piece that seemed less than cemented down.) To seal the shoes I sprayed them with "Super Seal" by Creative Imaginations. Super Seal is a miracle product that seals, water proofs, and makes your projects archival, too. The other marvel to SS is that it dries in under 5 minutes! I gave the shoes 5 coats to be sure and seal them as best I could. Now, I know that Presley cannot wear these shoes running and playing but she can definitely wear them to her next dress-up tea party!

Here you can see the back of the shoes and below you can see a side-view. The shoes were both unique because I did not repeat any of the major images. To make the shoes appear as if they were a pair I used the same background (base) print and small pink flowers as accents.

My hands were a total mess when I finished the first shoe because I used my fingers to mold and smooth and glue down each piece! I washed enough glue off to tackle the second shoe and then dealt with the dilemma of the sticky fingers once I got everything adhered. After about a dozen attempts with soap and water, it dawned on me to try fingernail polish remover! Yeah...that worked!

Here you can see the back of the shoes and below you can see a side-view. The shoes were both unique because I did not repeat any of the major images. To make the shoes appear as if they were a pair I used the same background (base) print and small pink flowers as accents.

My hands were a total mess when I finished the first shoe because I used my fingers to mold and smooth and glue down each piece! I washed enough glue off to tackle the second shoe and then dealt with the dilemma of the sticky fingers once I got everything adhered. After about a dozen attempts with soap and water, it dawned on me to try fingernail polish remover! Yeah...that worked!
I know you want to know, so I will fess up how long I spent on this project: about 3 hours per shoe...however, I will say that now that I have finished her pair, when I begin work on mine (well, of course I am making myself a pair...what would I wear to the tea party????) I am going to use Modge Podge this time around and see if it is easier to work with. I will report back after I conduct that experiment....

i LOVE these shoes! how did they hold up after wear? did you try out the modge podge, and was it better/worse? i'm wanting to do this on my wedding shoes, so they'll only be worn once, but my wedding will be in Scotland, so there's a good chance they'll get wet. is modge podge waterproof? thanks so much for the beautiful idea!
ReplyDelete